On this page, we're going to look at various instructions on how to use dry transfers — starting with our own:
- How to Apply Vintage 1960s Letraset Dry Rub-Down Instant Lettering
- Very Detailed Instructions: "Working with Dry Transfers"
- Simple Instructions from a Busy Bee
- Instructions in French (from La Vache Qui Rit)
- Action Transfer Lettering — the Spacematic System
- Select Your Weapon: a Choice of Styluses
Use the above links to explore THIS page, but if you're interested in applying different types of transfer, we have more pages for you:
- How to Apply Vintage 1960s Letraset Dry Rub-Down Instant Lettering (this page; see immediately below ↓
- How to Apply Vintage 1959 Letraset Waterslide Lettering →
- How to Apply a Waterslide Model Kit Transfer →
- How to Apply Waterslide Transfers to Drinking Glasses; plus Golly Transfers →
- How to Apply Some Lovely Décalcomanies →
- How to Apply a Vintage 1960s Temporary Tattoo →
- How to Apply a Vintage 1970s Iron-On Transfer →
- How to Apply a Sticker →
- How to Apply Topps Magic Rub-Offs & Hasbro Rub-Ons →
- How to Apply Stick'N'Lift (Hint: You Lift it & then you Stick it) →
How to Apply Vintage 1960s Letraset Dry Rub-Down Instant Lettering
A practical, illustrated, step-by-step guide.
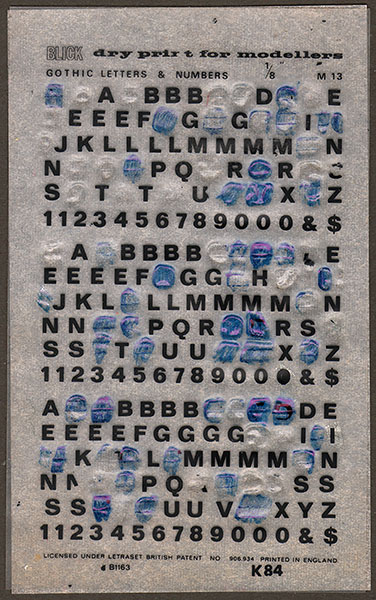
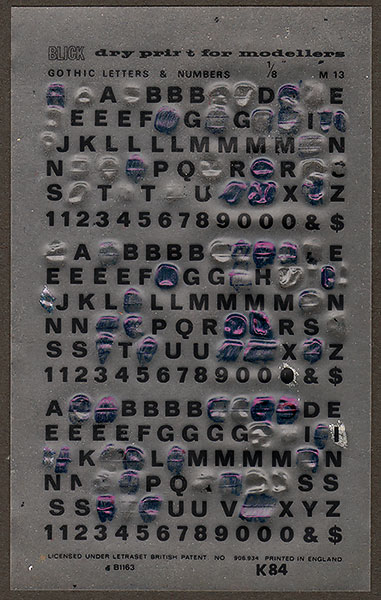
These Blick Dry Print lettering transfers were printed, of course, by Letraset. The K84 serial number dates this sheet to 1965. The first scan shows them with their protective backing tissue, & the second without it. In the event we decided to use another of these sheets, exactly the same but in white. (This was mainly because there were no instances of the letter "C" on this black sheet…)
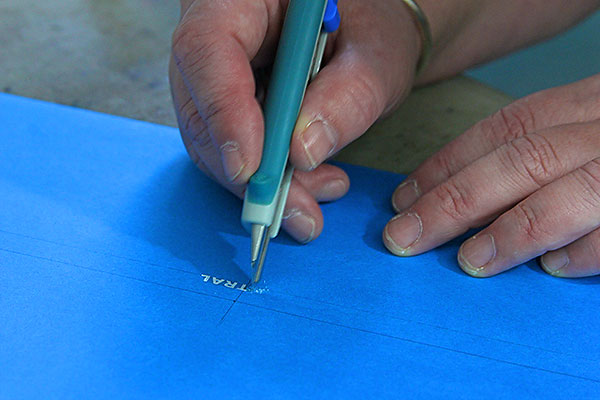
STEP ONE: Set your baseline.
Traditionally, a blue-lead pencil is used for this, since with certain optical printing systems they won't be reproduced. Otherwise, you will have to use an ordinary pencil lightly, & try to erase it as carefully as possible after the text has been transferred. If you are transferring Spacematic Instant Lettering, the lines on the transfer sheet should be used to align the text; if not (as here) then you will need to judge by eye. Needless to say, the recipient surface should be clean, dry, & free from grease. This ruler has an elevated edge, which is helpful to avoid smudging or blotting.
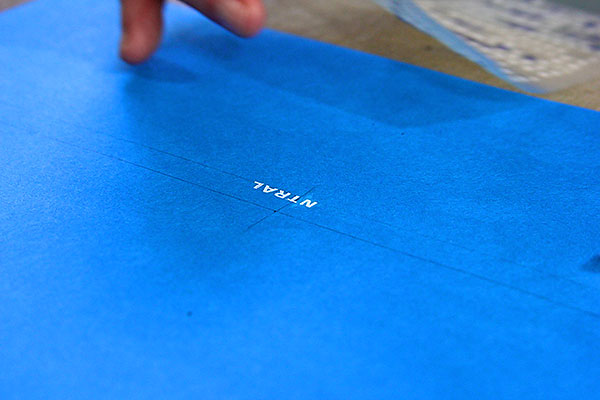
STEP TWO: Set your centre line.
It's worth taking care to get these lines accurate, because the eye is very sensitive to lettering which is even only slightly "off".
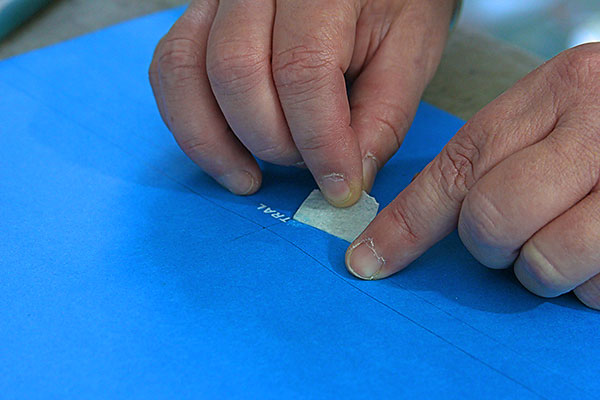
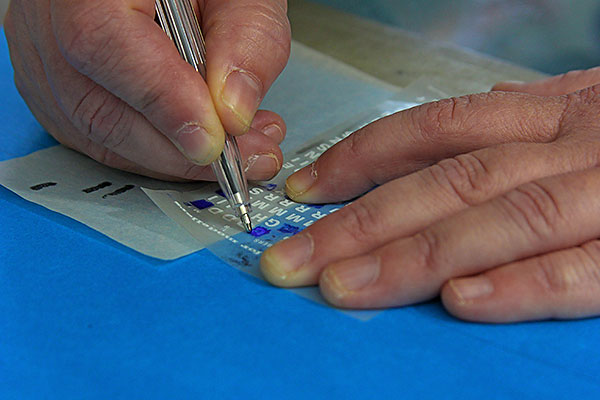
STEP THREE: Place & finger-press your first character.

The backing tissue must be moved out of the way so that the letter can be rubbed down, but it should be so placed as to continue to protect other characters from being accidentally transferred. You could just cut away the backing tissue from beneath the character you're working on, but this might mean your view of the surrounding area is obscured.
If, as here, the text alignment is centred, it makes sense to start with a letter in the centre of the line rather than starting with the more obvious left-most character.
When the character is in position, push the carrier sheet down onto the recipient surface with your finger. This will ensure the sheet doesn't move during transfer (which could cause cracking or rippling of the transfer).
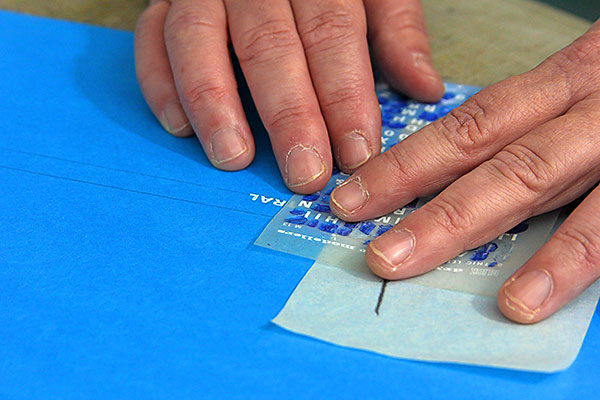
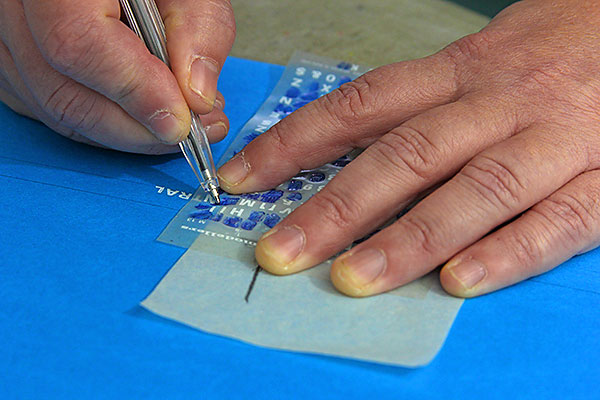
STEP FOUR: Rub down the transfer character.
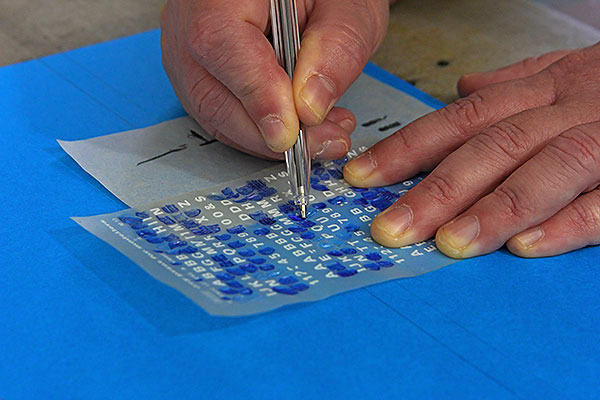
The traditional tool for this job is a ball-point pen, but a pencil or stylus would be equally satisfactory (& a stylus has the advantage of not obscuring the carrier sheet with ink). See below for a discussion of styluses…
The main trick is not to press too hard, or directly down; start rubbing lightly at an inclined angle, cover the entire area of the transfer, & keep going over & over until the colour of the transfer has changed — showing that the transfer has detached from the carrier sheet & is now attached to the recipient surface. This colour change is a subtle greying effect; it's the difference between seeing something right up against the glass of a window, & seeing it some distance away.
Pushing too hard will warp the carrier sheet, & very likely this will mean damage to the transfer. You can see in the top photos of the transfer sheets that the previous user had not understood this fine point!
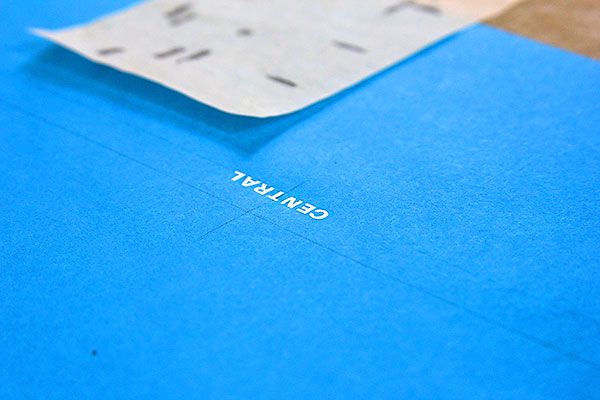
STEP FIVE: Carefully peel back the carrier sheet.
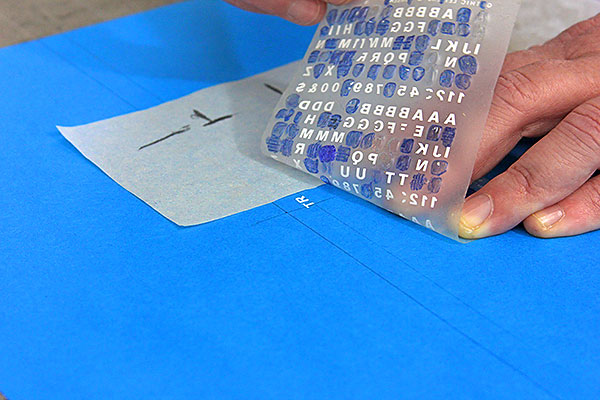
Do this slowly, looking out for signs that the character has not transferred completely. If it appears to have only partially transferred, gently replace the carrier sheet & go back to rubbing the character down. The chances are extremely good that this will solve the problem, since the carrier sheet has already been fixed lightly in position. Once all is well, remove the carrier sheet from the scene of the crime.
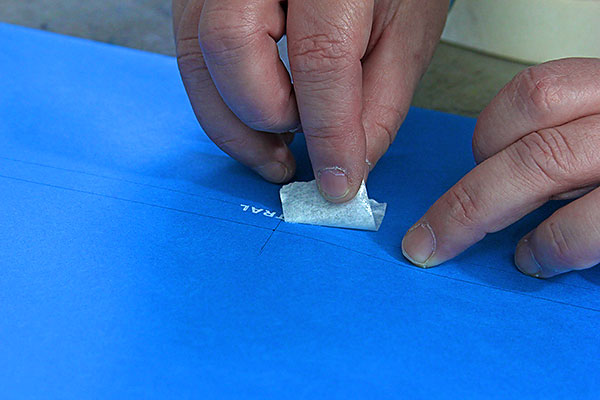
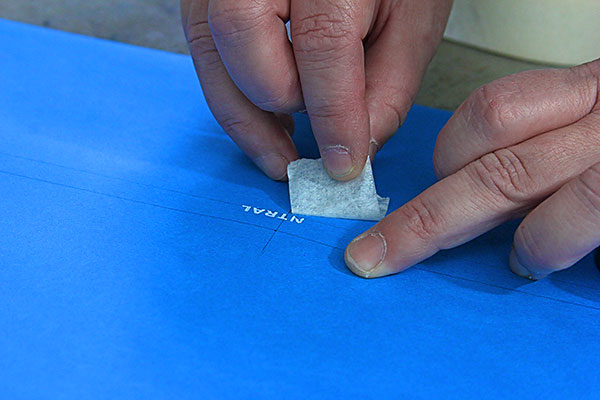
STEP SIX: Burnish the transfer into submission.

Place the backing tissue over the newly-transferred character, & give it a good rubbing with something solid (such as the blunt end of a ball-point pen) to help it decide to stick around, & not to peel off whenever it feels like it. After this treatment, the transfer can be referred to as burnished; there being a distinction between a burnished & an unburnished character, as we will see.
STEP SEVEN: Ooch.
If you realise that, despite your best efforts, something has gone wrong in transferring a character, all is not lost. It should be relatively easy to remove all trace of a messed-up character if you try these techniques; firstly, masking tape, or — if you dare try something stronger & your recipient surface can take it — cellulose tape may be enough to pick up the whole character if it is still unburnished.
STEP EIGHT: Double ooch.
Okay, that didn't work; probably because the transfer was already burnished. Next you can try various types of eraser. If even that fails…
STEP NINE: That's a triple ooch.
Alright, then. If the situation is that desperate, you can use a really sharp blade to scrape off the transfer without damaging the recipient surface. As you can see, this may create a certain amount of sticky detritus — so be careful not to get any over any perfectly satisfactory artwork.
STEP TEN: Ooch Clean-up.
Now the trick with the masking tape really should work in removing the detritus.
STEP ELEVEN: Déja vu.
Place the same character in the same position as the one you just removed.
STEP TWELVE: Repeat.
Go through the above steps again until you have a nice clean character just where you want it.
STEP THIRTEEN: Are you happy now?
Now might be a good time to mention that if your transfers are intended for permanent display (e.g. signs, model kits, ornaments, etc.) rather than reprographic purposes, there are a variety of ways to protect them from potential damage. Clear plastic sheeting is one option, & there are a variety of clear varnishes that may be suitable. Some chemicals, however, may damage the transfers, so as always it's a good idea to test out any new technique with an experimental trial; in other words, try them out on a disposable sample before going for 'the real thing'.
STEP FOURTEEN: Continue until finished.
Keep adding new characters to the recipient surface until the job is complete, taking care as you go not to disturb or damage the characters you've already rubbed down. Although they shouldn't be easily damaged or lifted off once they've been burnished, it still pays to be careful.
STEP FIFTEEN: Secret pre-release method.
Now that you've finished, I can let you in on a little secret that might have saved you some difficulty earlier. (As always with instructions, it pays to read them through first!)
There is a slightly different way of rubbing down transfers which may be appropriate when the recipient surface is unavoidably dirty, greasy, uneven or damaged. You can actually start to rub down the transfers before placing them on the recipient surface; that's to say, rub them lightly, with the protective tissue still in place, until the change in colour indicates that they're free of the carrier sheet & ready to adhere. Then remove the protective tissue, place the transfer in position, & continue rubbing the transfer so that it adheres to the recipient surface.
You can see that this pre-release method is potentially quite tricky, so you probably should only use it in exceptional circumstances; but it does make it easier to apply the transfers to the recipient surface when a lot of rubbing would be risky or impractical. The pre-release method is probably better at applying transfers to model kits than the usual method outlined above. Now aren't you glad you read the whole article?
STEP SIXTEEN: Erase the pencil lines (if necessary).
Curses — we forgot to do that…
Very Detailed Instructions: "Working with Dry Transfers"
These notes came with the packs of Titles for Electronic Equipment packs from 1964. They are the most thorough transfer instructions I have ever seen…
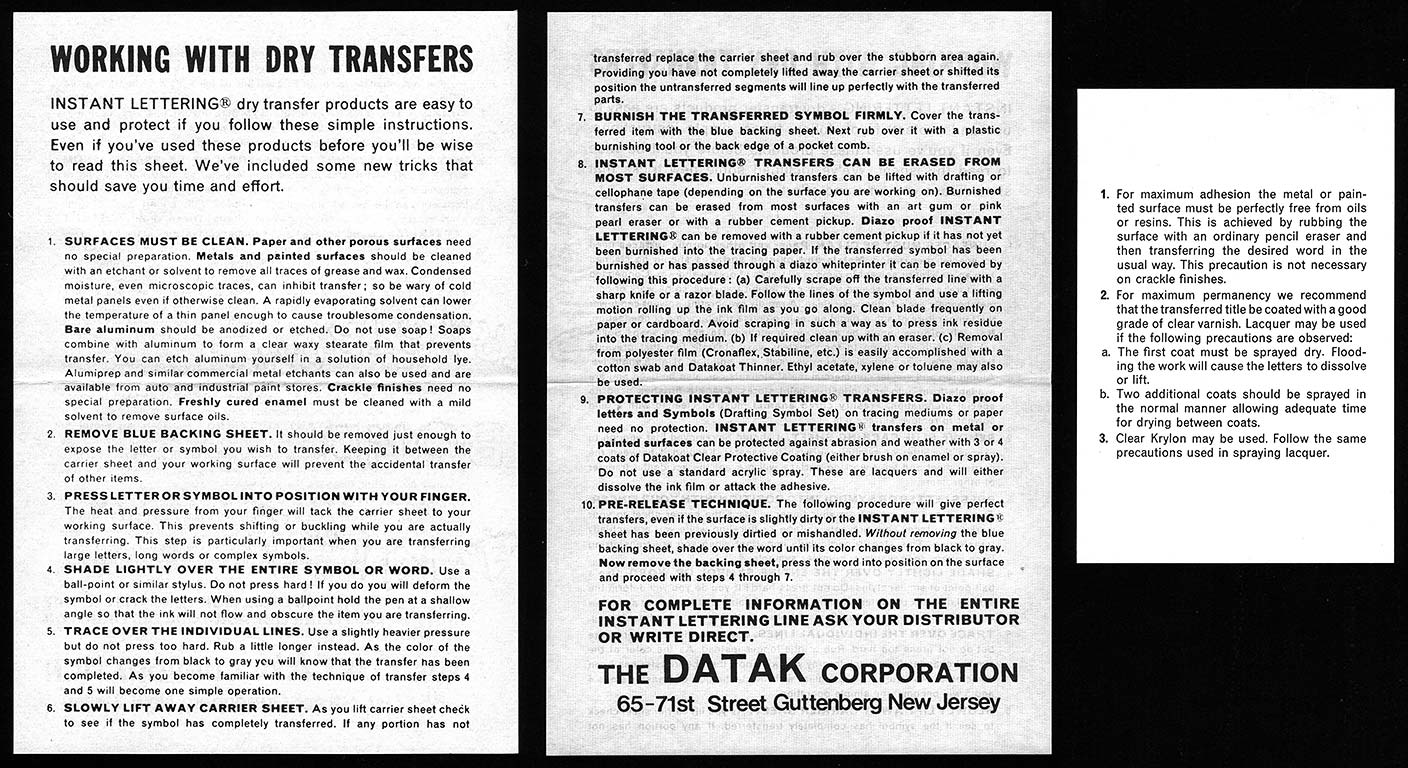
INSTANT LETTERING® dry transfer products are easy to use and protect if you follow these simple instructions. Even if you've used these products before you'll be wise to read this sheet. We've included some new tricks that should save you time and effort.
- WORKING WITH DRY TRANSFERS
- SURFACES MUST BE CLEAN. Paper and other porous surfaces need no special preparation. Metals and painted surfaces should be cleaned with an etchant or solvent to remove all traces of grease and wax. Condensed moisture, even microscopic traces, can inhibit transfer; so be wary of cold metal panels even if otherwise clean. A rapidly evaporating solvent can lower the temperature of a thin panel enough to cause troublesome condensation. Bare aluminium should be anodised or etched. Do not use soap! Soaps combine with aluminium to form a clear waxy stearate film that prevents transfer. You can etch aluminium yourself in a solution of household lye. Alumiprep and similar commercial metal etchants can also be used and are available from auto and industrial paint stores. Crackle finishes need no special preparation. Freshly cured enamel must be cleaned with a mild solvent to remove surface oils.
- REMOVE BLUE BACKING SHEET. It should be removed just enough to expose the letter or symbol you wish to transfer. Keeping it between the carrier sheet and your working surface will prevent the accidental transfer of other items.
- PRESS LETTER OR SYMBOL INTO POSITION WITH YOUR FINGER. The heat and pressure from your finger will tack the carrier sheet to your working surface. This prevents shifting or buckling while you are actually transferring. This step is particularly important when you are transferring large letters, long words or complex symbols.
- SHADE LIGHTLY OVER THE ENTIRE SYMBOL OR WORD. Use a ball-point or similar stylus. Do not press hard! If you do you will deform the symbol or crack the letters. When using a ballpoint hold the pen at a shallow angle so that the ink will not flow and obscure the item you are transferring.
- TRACE OVER THE INDIVIDUAL LINES. Use a slightly heavier pressure but do not press too hard. Rub a little longer instead. As the colour of the symbol changes from black to grey you will know that the transfer has been completed. As you become familiar with the technique of transfer steps 4 and 5 will become one simple operation.
- SLOWLY LIFT AWAY THE CARRIER SHEET. As you lift carrier sheet check to see if the symbol has completely transferred. If any portion has not transferred replace the carrier sheet and rub over the stubborn area again. Providing you have not completely lifted away the carrier sheet or shifted its position the untransferred segments will line up perfectly with the transferred parts.
- BURNISH THE TRANSFERRED SYMBOL FIRMLY. Cover the transferred item with the blue backing sheet. Next rub over it with a plastic burnishing tool or the back edge of a pocket comb.
- INSTANT LETTERING® TRANSFERS CAN BE ERASED FROM MOST SURFACES. Unburnished transfers can be lifted with drafting or cellophane tape (depending on the surface you are working on). Burnished transfers can be erased from most surfaces with an art gum or pink pearly eraser or with a rubber cement pickup. Diazo proof INSTANT LETTERING® can be removed with a rubber cement pickup if it has not yet been burnished into the tracing paper. If the transferred symbol has been burnished or has passed through a diazo whiteprinter it can be removed by following this procedure: (a) Carefully scrape off the transferred line with a sharp knife or a razor blade. Follow the lines of the symbol and use a lifting motion rolling up the ink film as you go along. Clean blades frequently on paper or cardboard. Avoid scraping in such a way as to press ink residue into the tracing medium. (b) If required clean up with an eraser. (c) Removal from polyester film (Cronaflex, Stabiline, etc.) is easily accomplished with a cotton swab and Datakoat Thinner. Ethyl acetate, xylene or toluene may also be used.
- PROTECTING INSTANT LETTERING® TRANSFERS. Diazo proof letters and Symbols (Drafting Symbol Set) on tracing mediums or paper need no protection. INSTANT LETTERING® transfers on metal or painted surfaces can be protected against abrasion and weather with 3 or 4 coats of Datakoat Clear Protective Coating (either brush on enamel or spray). Do not use a standard acrylic spray. These are lacquers and will either dissolve the ink film or attack the adhesive.
- PRE-RELEASE TECHNIQUE. The following procedure will give perfect transfers, even if the surface is slightly dirty or the INSTANT LETTERING® sheet has been previously dirtied or mishandled. Without removing the blue backing sheet, shade over the word until its colour changes from black to grey. Now remove the backing sheet, press the word into position on the surface and proceed with steps 4 to 7.
Simple Instructions
Some slightly less complicated suggestions, from an early Busy Bee Instant Picture Pack (K25):
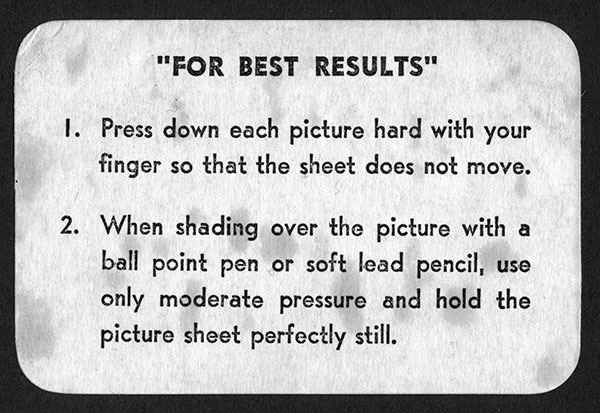
- "FOR BEST RESULTS"
- Press down each picture hard with your finger so that the sheet does not move.
- When shading over the picture with a ball point pen or soft lead pencil, use only moderate pressure and hold the picture sheet perfectly still.
Instructions in French
The beauty of these early instructions from a 'La Vache Qui Rit' promotion is that they feel the need to warn you not to dip the transfers in water. Presumably dry transfers were still something of a novelty in France in 1969.
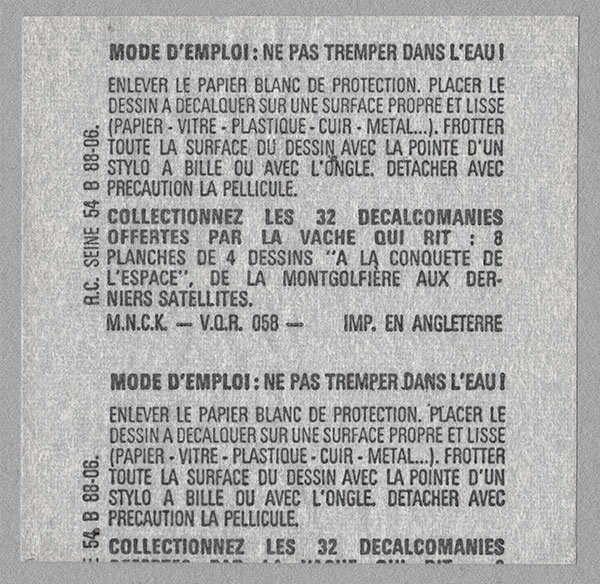
- MODE D'EMPLOI: NE PAS TREMPER DANS L'EAU!
- Enlever le papier blanc de protection.
- Placer le dessin a decalquer sur une surface propre et liss (papier - vitre - plastique - cuir - metal…).
- Frotter toute la surface du dessin avec la pointe d'un stylo a bille ou avec l'ongle.
- Detacher avec precaution la pellicule.
You can find out more about this promotion on our page "A La Conquête de l'Espace".
Action Transfer Lettering — the Spacematic System
I am very grateful to John Hunt (former manager of Letraset Consumer Products) for sending me this item from his personal memorabilia. We think that, as a late example, it may represent an attempt to hold onto the trademark 'Action Transfers'.
![]()
![]()
![]()
![]()
THE SPACEMATIC SYSTEM
This is a system devised by Letraset to help make lettering even easier and to give a first class result. The Spacematic guide marks appear under every letter. Lining up and spacing between letters can be done accurately by using the following method:
- Draw a feint (sic) pencil line on the surface you intend lettering. This will be your base line, so allow for the height of the letters.
- Remove paper backing sheet and position this underneath the pencil line.
- Position the plastic transfer sheet so that the first letter of your word is in the desired position with the Spacematic marks on the pencil line.
- Carefully rub over this letter using the cap of a ball point pen or a soft pencil, taking care that the film does not move. Keeping the transfer sheet in place also rub over the right-hand Spacematic mark (see fig. 1).
- Take your next letter and position this so that the Spacematic marks are on the pencil line with the left-hand mark butted up to the previous one rubbed down (see fig. 2). Repeat the rubbing down process as stated above transferring then the right-hand Spacematic marks every time. There is no need to rub down the left-hand mark as this is for positioning only.
- To remove the Spacematic marks erase with a soft rubber or use a strip of clear cellulose tape. Finally, to ensure a more permanent result, rub over the lettering with the paper backing sheet.
- SOME USEFUL HINTS
- Do not use heavy pressure when rubbing down the letters, or use a pencil with a sharp point, this will only damage the carrier film and possibly the lettering.
- A clear varnish can be used to protect the lettering but make sure you read the manufacturer's instructions carefully in case the surface being used is not suitable.
Select Your Weapon: a Choice of Styluses
Above we see two tools, each from one extreme of Letraset's history. The Letraset Carrier Frame was an indispensable part of the Letraset Type Lettering System from 1959, which used waterslide transfers because they hadn't invented dry rub-down transfers yet. The "MagiX Stick™" from 1984 came from a Thomas Salter boxed transfer set. This would have been right at the end of Thomas Salter's run; probably the stylus was so-called because it was also supplied with PrestoMagiX boxed sets.
Below are some styluses supplied in Junior Panoramas, circa 1971. The only difference between a Busy Bee & a Junior Panorama was the presence of this stylus, & a fancy envelope to put it in alongside the Busy Bee pack.

Here are the links to those "What are Transfers?" article pages again in full:
- "What are Transfers?" (Main Page) ↑
- Temporary Tattoos, including "How to Apply a Vintage 1960s Temporary Tattoo" →
- How to Apply a Waterslide Model Kit Transfer →
- Waterslide Transfers Applied to Drinking Glasses; plus Golly Transfers →
- The Letraset Type Lettering System →
- How to Apply Vintage 1959 Letraset Waterslide Lettering →
- Letraset's dry rub-down "Instant Lettering" →
- Heat Transfers, including "How to Apply a Vintage 1970s Iron-On Transfer" →
- How to Apply Letraset Dry Rub-Down Transfers (this page; see above ↑)
- How Dry Rub-Down Transfers Work →
- Topps Rub-Offs, Hasbro Rub-Ons, & Trans-Action →
- Some Lovely Décalcomanies →
- How to Apply a Sticker (& other Sticker treats) →
- Stick'N'Lift →